2.6.0 | 03/18/2025
Create Template with Template Builder | Add Dynamic Rows or Columns | Add Images | Delete Sheets with Conditional Logic | Built-in Microsoft Excel Formulas and Cell formatting | Test Your Template
Keep The Look and Feel That Suits Your Needs
When working with Mambo Merge, creating an XLSX template allows you to generate professional spreadsheets filled with dynamic data from your Salesforce Org. XLSX templates are flexible and ideal for producing reports, data summaries, and forms. Here’s a step-by-step guide to help you get started in creating your XLSX template.
Prepare Your XLSX Template ↵
You can start with a Blank Spreasheet or use a document that previously has been filled out manually.
As with DOCX templates, the Template Builder (or Routine Wizard’s Merge Data) is where you will start off. It lists merge fields avaiable.
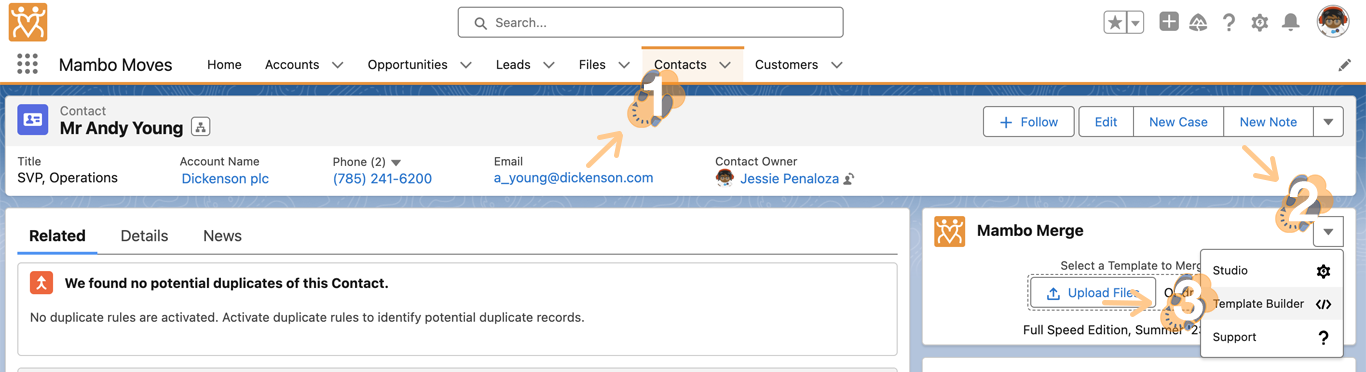
Step 1: Open Template Builder
The Template Builder is located on the component you wish to generate a template from, click on the Dropdown Menu, a “Down Arrow box”, and select “Template Builder”.
Step 2: Add Merge Fields to Template
With the “Template Builder” loaded, you can identify each “Merge Field” syntax along with its actual “Value”. Find Conditional and Function Merge Fields that help customize Templates even more.
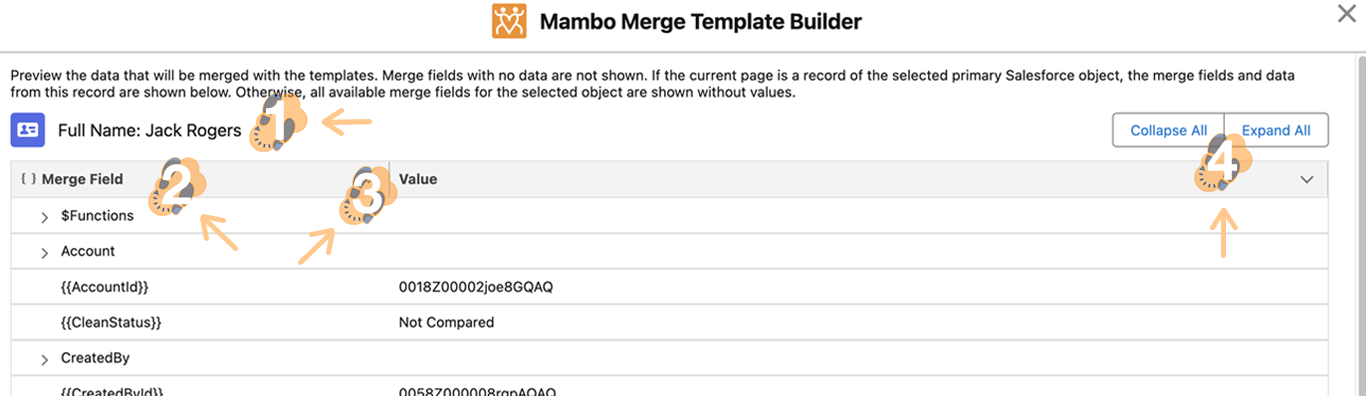
After identifying the merge field , click the “Clipboard” button to the right of the merge fields, to easily add them into your Template.
-
Use the {{FieldName}} syntax, where FieldName represents the field from the related Salesforce object.
-
For example, {{Account.Name}} will populate the Account Name field in your XLSX file when the document is generated.
Note: You can learn more about merge function syntax such as ( TODAY(), UPPER(), and ForEach ) in our Merge Functions or Glossary articles.
Add Dynamic Rows or Columns ↵
Another familiar merge field used in the DOCX Templates is {{ForEach:RelatedList}}{{/ForEach:RelatedList}}. You can use the ForEach functionality in XLSX templates to repeat rows or columns based on related lists:
-
For Rows: Place {{RowsForEach:RelatedListName}} in any cell within the row you want to repeat. Mambo Merge will dynamically repeat the row for each record in the related list.
-
For Columns: Similarly, use {{ColumnsForEach:RelatedListName}} to repeat columns.
-
Advanced Formatting: You can specify how many rows or columns to repeat using a number at the start of the field. For example, {{2RowsForEach:RelatedListName}} in cell A6 will duplicate rows 6 and 7 based on the number of related records.
Add Images to your Document from your Salesforce Org.↵
You can insert images dynamically into your XLSX template by using the {{ReplaceImage(FieldName)}} syntax. Add a placeholder image in your template and insert the merge function in the Alt Text of the image, and Mambo Merge will replace it with the image referenced in the merge field.
Delete Sheets with Conditional Logic ↵
With Mambo Merge, you can add conditional logic to your XLSX template, allowing specific parts of the document to delete based on conditions:
-
Use {{DeleteSheetIf:true (conditional)}} to delete specific sheets from the document if a condition is met.
-
For example, {{DeleteSheetIf:true closedate<=“01/01/2023”}} will delete the Sheet if the criteria is met.
Built-in Microsoft Formulas and Cell formatting are respected by Mambo Merge. ↵
-
If you have a formula like SUM(A6:A6) in a cell, and row 6 is repeated four times, the formula will adjust to SUM(A6:A10).
-
If a merge field adds a number value to a cell with the format set to Currency, number is displayed in format with corresponding currency symbol. For example, value “456” would be output as "$456.00".
Note: Once you have added all the merge syntax you need, simply format the layout based on the type of document you plan to generate.
Test Your Template ↵
Testing the template before adding it to your workflow can greatly help reduce the back-and-forth changes. Test your template and adjust it as you see fit
Step 1: Upload Your Template to Salesforce:
Navigate to the Mambo Merge Template Library and upload your newly created XLSX file. Assign to a component or add to a Routine.
Step 2: Run a Merge Test:
Generate a document using the template and check for any errors or adjustments that need to be made.
Step 3: Adjust and Refine:
Make any necessary changes to your merge fields, layout, or conditional logic in the template.
Take a Break. You just saved so much time!
All your finished templates are organized and able to be easily updated within your FILES tab when needed. Now, you’re ready to use your XLSX template for professional spreadsheets directly from Salesforce data!